Water intrusion around windows is one of the most common and costly home-repair problems. Rain, wind-driven moisture, and snow can exploit tiny gaps at the window perimeter, leading to rot, mold, and drafts. A proper window flashing installation creates a protective barrier that guides water away from the interior and into the exterior environment. By understanding the flashing sequence and choosing the right materials, homeowners and contractors can extend the life of a window, improve energy efficiency, and avoid expensive repairs down the line.
At its core, flashing is a weatherproofing system that directs water out of the rough opening and behind exterior cladding. Getting the installation right matters just as much as selecting the best window. When flashing is done correctly, it forms a continuous, water-shedding plane that works with the building wrap, drip edges, and siding. For a detailed, step-by-step guide, explore window flashing installation and learn how to seal waterproofing and prevent costly leaks in any home build or renovation project.
Why proper flashing installation matters
Windows are entry points for moisture if left unsealed. Proper flashing installation protects sill reveals, sides, and heads by creating a bonded path for water to move away from the interior. It also plays a key role in preventing air leaks and optimizing insulation. In climates with heavy rainfall or freeze-thaw cycles, neglecting flashing can lead to accelerated deterioration of framing, stops, and interior finishes. A well-executed flashing strategy complements flashing tapes, sealants, and housewrap to form a cohesive weather barrier around the window.
What you’ll need
- Self-adhesive flashing tape (butyl or asphalt-based) and/or metal flashing
- Sill pan or drip edge, if required by the window type
- Exterior-grade caulk or sealant compatible with your siding
- Backer rod and exterior sealant for joints
- Weather-resistant barrier (WRB) and building wrap
- Utility knife, caulk gun, tape measure, Level, and screws as needed
- Appropriate butyl or foam gap fillers and shims
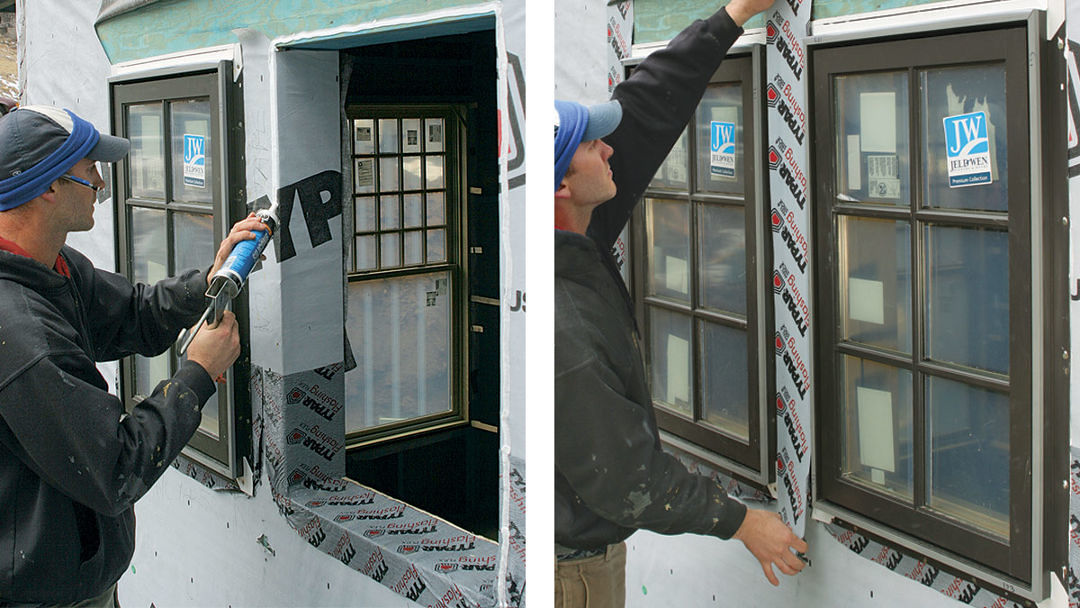
Step-by-step overview of a typical window flashing installation
Note that details can vary by window type, siding, and climate. Always follow the window manufacturer’s instructions. A general sequence looks like this: start with a clean, dry rough opening and install a sill pan or drip edge to shed water away from the interior. Apply a continuous sheet of flashing tape along the sill, extending up the sides a few inches. Reinforce corners with folded pieces or corner-specific flashing to prevent tearing. Seal the perimeter of the rough opening with a thin bead of caulk before installing the window, then set the window plumb and square with shims as needed.
After the unit is secured, run continuous flashing strips up the sides and across the head, overlapping the sill flashing to form a continuous waterproof raceway. If the siding plan requires, add a secondary layer of flashing behind the exterior cladding and over the WRB for extra protection. Finally, seal along all perimeter joints with exterior-grade caulk and backer rod where appropriate, then install interior and exterior trims. A successful window flashing installation creates a tight seam that resists wind-driven moisture and helps prevent leaks during heavy rain and seasonal shifts.
Maintenance, inspection, and common pitfalls
Inspect windows annually for missing flashing, cracks in sealant, or lifting tapes. Re-seal any gaps promptly and replace damaged flashing material as needed. Common mistakes include skipping the sill pan, failing to overlap flashing correctly, and using incompatible caulk with the chosen flashing material. Choosing the right materials for your climate—such as cold-weather compatible sealants or UV-stable tapes—will prolong performance. If you’re unsure about the flashing details, consulting a professional can save time and avoid costly mistakes.
For more guides and inspiration on home improvement topics, visit the Publishie homepage.